 |
Leosac
0.8.0
Open Source Access Control
|
 |
Leosac
0.8.0
Open Source Access Control
|
Module that reacts to authentication event.
The Doorman module is very important to Leosac's usability. It is the module responsible for reacting to messages sent by authentication / authorization modules.
If an access is granted (or denied) one (or more) actions can be taken by this module:
The main goal of this module is to trigger action on others components in the system. This is done by sending message to them.
| Options | Options | Options | Options | Options | Description | Mandatory |
|---|---|---|---|---|---|---|
| instances | Multiples (unrelated) doorman instance are allowed | YES | ||||
| —> | instance | Configuration information for 1 instance | YES | |||
| —> | —> | name | Name of this doorman instance | YES | ||
| —> | —> | auth_contexts | Message from multiple contexts can lead to the same action | YES | ||
| —> | —> | —> | auth_context | Information for an Auth Context | YES | |
| —> | —> | —> | —> | name | Name of the auth context we are using | YES |
| —> | —> | actions | Configure the actions to take when something happens | YES | ||
| —> | —> | —> | action | Configuration information for one action | YES | |
| —> | —> | —> | —> | on | When should the action be taken (DENIED / GRANTED) | YES |
| —> | —> | —> | —> | target | Name of the targeted object that will receive the action command | YES |
| —> | —> | —> | —> | cmd | Description for the command that will be sent | YES |
| doors | Optionally declares the doors | NO | ||||
| —> | door | Declare one door | YES | |||
| —> | —> | name | A name for the door | YES | ||
| —> | —> | gpio | The GPIO to turn on/off based on the door's state | YES | ||
| —> | —> | on | Some schedules for when the door is in "always open" mode | NO | ||
| —> | —> | —> | schedules | See here to learn how to declare schedules | YES | |
| —> | —> | off | Some schedules for when the door is in "always closed" mode | NO | ||
| —> | —> | —> | schedules | See here to learn how to declare schedules | YES | |
| —> | —> | exitreq | Manage "request to exit" for the door (usually a push button) | NO | ||
| —> | —> | —> | gpio | The request to exit GPIO | YES | |
| —> | —> | —> | duration | The normal state (open / close) | YES | |
| —> | —> | contact | Duration to keep the door open | NO | ||
| —> | —> | —> | gpio | The contact sensor GPIO. Interrupt mode needs to be set to Both. | YES | |
| —> | —> | —> | duration | Duration before triggering an alarm | YES |
<cmd> tag is quite simple. It looks like this: For each frame you want in the command message, use <fX> where X is growing for each frame you want.
@hr
instances.instance.actions.action.target is the name of an object that has been defined in the system. It could be the name of a GPIO you defined before ("my_super_gpio") or some reader object ("my_wiegand1"), etc.@hr
doors is optional, and is only ever useful if you make use of the "always open", "always close", "exit request" or "contact" feature.This is a very simple example that requires a component named "gpio_door" to open for 2.5 seconds when an successful authentication happens. If the authentication fails, it would ask the "led_failure" to turns on to 2.5s.
The following example file defines the following:
GREEN_LED (with ON and 1500 as parameters) command to the MY_WIEGAND_1 device. This will light the green led of the reader for 1.5second.ON command (with 500 as parameter) to the wiegand_buzzer GPIO, causing the device to beep for 0.5 second.
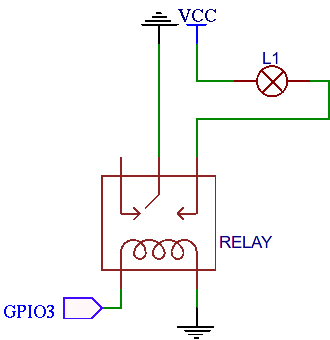
The relay is used to control the door. Here it is materialized by a lamp for the sake of simplicity, but feel free to replace it by the mechanism you want to use to open the door, like an electric strike. If you really don't have this hardware now, you could also just left the controlled circuit open (just wire the GPIO), and you'll hear the relay click when the door is activated.